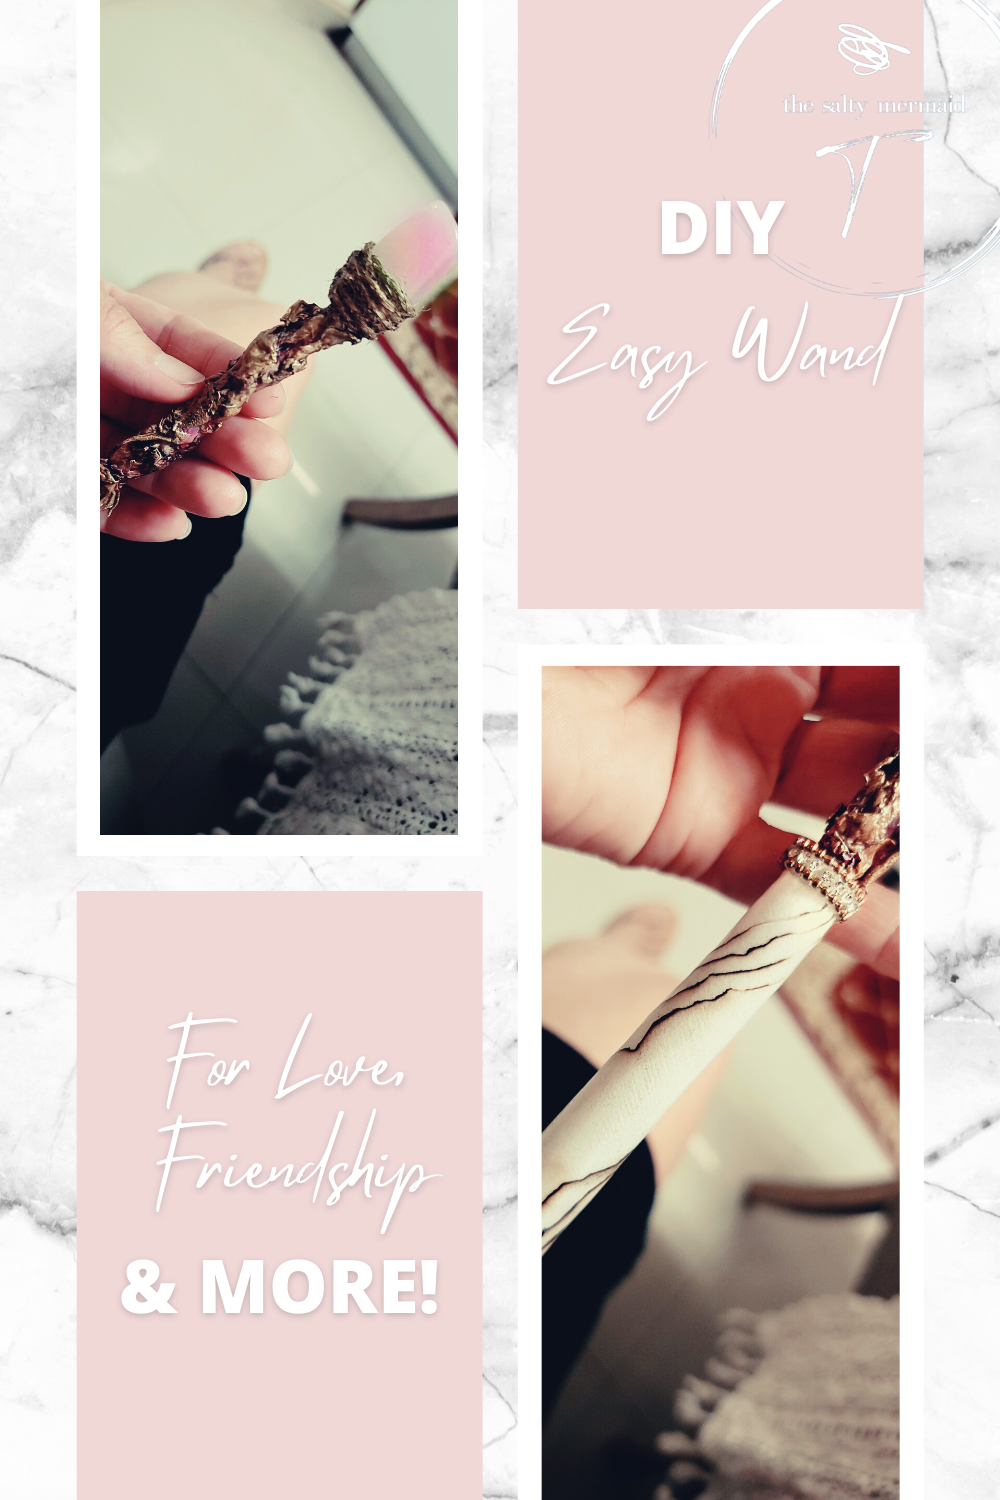
DIY Wand for Friendship, Love, Self Care & More!
This is a really
pretty wand that just like the other designs I’ve shared here, you can use for
real use with your spell work, or to make something REALLY cute that your kids
will LOVE to play with. I’m adding the directions and items I used, but feel
free to make this your own. You don’t have to synchronize here. If you like the
natural coloring of the rose petals, skip the paint – or use silver, white –
any other color you prefer. You can use colored paper for the wand handle, use
other types of dried flowers for the floral texture design, a different crystal
or herb root for the tip… it’s all totally customizable.
Hands on Working
Time: Only 20 minutes
Total Project Time with Drying: Approximately 14 hours at the most
Like I always mention - A very common misconception is that to work spells and magick (or to DIY craft at home in general), you have to spend a lot of money. That’s not true at all. The only important thing to always remember for spell work, is to use items that you feel something towards. Pick items that carry significance, emotional value and / or any kind of connection for you. When you create items this way, the results are never going to be the same across the board with final looks. In witchcraft, everything should be totally unique because it’s made from your heart and connected to you. There is no such thing as wrong, ugly or “won’t work” if you are following the feeling in your body when you are creating.
For this wand
design I used…

To make the
wand handle, I made up this really cool technique of burning and rolling the
paper. It turned out amazing! It almost looks marbled and it gives an earthy
vintage touch. I took my lighter and lightly burned all 4 sides of my stacked paper.
Then I gave it a good shake over the sink to get all of the free falling ash
off the paper.

Then I rolled
the stack of paper lengthwise and slightly off center so the burnt edges ended
up wrapping around the handle several times all the way down the handle. With
the glue gun, I secured the last little flap piece down after I was done
rolling the entire handle so the handle stayed together. I had to put a dab of
glue between each piece to keep all 4 pieces in place. It only took a second. I
love glue guns. The hot glue dries so fast!

I wanted my
wand end to be straight, so I took some scissors and cut the top and bottom of
the wand handle straight across and I used those extra pieces to roll and stuff
them in the bottom of the handle to close the bottom end in completely. Then I
took the random marker and put it in the open end where my wand body and tip
were going to be inserted and tied a piece of jute around it so I could easily hang
it to dry after coating on a hanger. Then I dipped the entire wand end into mod
podge, let the excess run off and when it came to a slow drip, hung the wand
handle on the hanger with a paper towel underneath and left it to dry overnight.

While I left the
wand handle to start to dry - I took the chopstick, added some mod podge and
rolled it in the rose petals and I hung that to dry as well. After an hour the
rose petals were totally dry, so I took the chopstick with the roses and squished
the rose petals around to be exactly how I wanted them to look. Then I dipped
the entire rose covered chop stick into the mod podge just like I did with the
handle and hung it to dry overnight with tied jute on the same hanger as the
handle.

First thing the
next morning, I used the glue gun to add my rose quartz crystal to the tip of
the rose petal covered chopstick. Then used more glue gun glue to wrap and
secure jute to hold the crystal into place. Then I took my gold acrylic paint
and painted the jute so it looked like spun gold and lightly painted over the
roses so they had gold edging, but also some of the rose color peeking through.
Then I left that part of the wand to dry for about 2 more hours to make sure the
paint was totally, totally, totally dry.

Then the final
touch… I pulled the random marker out of the hung dried handle and I squeezed a
bunch of glue gun glue into the open end of the handle and pushed the chopstick
into the handle so everything was finally one piece. Then I added a little more
glue gun glue and stuck my earring to the wand on the handle piece right where
it met with the rose piece and used my fingers to squeeze the earring shut.

And that was it! All finished! It sounds like a
lot of work but hands on time, I might have been actively working for a total
of 20 minutes at the absolute most. It really was a nothing, super easy project
that anyone could handle and it turned out really beautiful and functional.
Total Project Time with Drying: Approximately 14 hours at the most
Like I always mention - A very common misconception is that to work spells and magick (or to DIY craft at home in general), you have to spend a lot of money. That’s not true at all. The only important thing to always remember for spell work, is to use items that you feel something towards. Pick items that carry significance, emotional value and / or any kind of connection for you. When you create items this way, the results are never going to be the same across the board with final looks. In witchcraft, everything should be totally unique because it’s made from your heart and connected to you. There is no such thing as wrong, ugly or “won’t work” if you are following the feeling in your body when you are creating.
- A handful of dried rose petals
- Gold acrylic paint
- A piece of jute about 6 inches long
- A chop stick
- Some mod podge
- A glue gun with a clear glue stick
- An old hoop earring (just one, the other one went missing forever ago… lol!)
- A rose quartz stone from the same National Geographic kit I bought months ago (BEST kit ever!!)
- 2 pieces of white computer paper folded in half crosswise and cut on the fold so I ended up with 4 pieces of paper that measured 4.25” x 5.5”
- A lighter
- Scissors
- Random permanent marker